Apache Airflow Part 2 — Connections, Hooks, reading and writing to Postgres, and XComs

In part 1, we went through have have basic DAGs that read, logged, and write to custom files, and got an overall sense of file location and places in Airflow. A lot of the work was getting Airflow running locally, and then at the end of the post, a quick start in having it do work.

In part 2 here, we’re going to look through and start some read and writes to a database, and show how tasks can run together in a directed, acyclical manner. Even though they’ll both be with a single database, you can think of stretching them out in other situations.

Again, this post will assume you’re going through and writing this code on your own with some copy paste. If you’re on the path of using what I have written, checkout the github repo here.

Creating database

This post is going to go through and write to postgres. We already created a database for Airflow itself to use, but we want to leave that alone.

So before we get to any of the python code, go and create the new database, add a new user with password, and then create the dts (short name for datetimes, since that’s all we’re doing here) table.

bigishdata=> create table dts (id serial primary key, run_time timestamp, execution_time timestamp);
CREATE TABLE
bigishdata=> \dt
            List of relations
 Schema | Name  | Type  |     Owner
--------+-------+-------+----------------
 public | dts   | table | bigishdatauser
(1 rows)

bigishdata=# \d dts
                                          Table "public.dts"
     Column     |            Type             | Collation | Nullable |             Default
----------------+-----------------------------+-----------+----------+---------------------------------
 id             | integer                     |           | not null | nextval('dts_id_seq'::regclass)
 run_time       | timestamp without time zone |           |          |
 execution_time | timestamp without time zone |           |          |
Indexes:
    "dts_pkey" PRIMARY KEY, btree (id)

Adding the Connection

Connections is well named term you’ll see all over in Airflow speak. They’re defined as “[t]he connection information to external systems” which could mean usernames, passwords, ports, etc. for when you want to connect to things like databases, AWS, Google Cloud, various data lakes or warehouses. Anything that requires information to connect to, you’ll be able to put that information in a Connection.

With airflow webserver running, go to the UI, find the Admin dropdown on the top navbar, and click Connections. Like example DAGs, you’ll see many default Connections, which are really great to see what information is needed for those connections, and also to see what connections are available and what platforms you can move data to and from.

Take the values for the database we’re using here — the (local)host, schema (meaning database name), login (username), password, port — and put that into the form shown below. At the top, you’ll see Conn Id, and in that input create a name for the connection. This name is clearly important, and you’ll see that we use that in order to say which Connection we want.

Screen Shot 2020-03-29 at 4.40.22 PM.png

When you save this, you can go to the Airflow database, find the connection table, and you can see the see the values you inputted in that form. You’ll also probably see that your password is there in plain text. For this post, I’m not going to talk about encrypting it, but you’re able to do that, and should, of course.

One more thing to look at is in the source code, the Connection model, form, and view. It’s a flask app! And great to see the source code to get a much better understanding for something like adding information for a connection.

Hooks

In order to use the information in a Connection, we use what is called a Hook. A Hook takes the information in the Connection, and hooks you up with the service that you created the Connection with. Another nicely named term.

Continue reading

How to Build Your Own Blockchain Part 4.2 — Ethereum Proof of Work Difficulty Explained

We’re back at it in the Proof of Work difficulty spectrum, this time going through how Ethereum’s difficulty changes over time. This is part 4.2 of the part 4 series, where part 4.1 was about Bitcoin’s PoW difficulty, and the following 4.3 will be about jbc’s PoW difficulty.

TL;DR

To calculate the difficulty for the next Ethereum block, you calculate the time it took to mine the previous block, and if that time difference was greater than the goal time, then the difficulty goes down to make mining the next block quicker. If it was less than the time goal, then difficulty goes up to attempt to mine the next block quicker.

There are three parts to determining the new difficulty: offset, which determines the standard amount of change from one difficulty to the next; sign, which determines if the difficulty should go up or down; and bomb, which adds on extra difficulty depending on the block’s number.

These numbers are calculated slightly differently for the different forks, Frontier, Homestead, and Metropolis, but the overall formula for calculating the next difficulty is

target = parent.difficulty + (offset * sign) + bomb

Other Posts in This Series

Pre notes

For the following code examples, this will be the class of the block.

class Block():
  def __init__(self, number, timestamp, difficulty, uncles=None):
    self.number = number
    self.timestamp = timestamp
    self.difficulty = difficulty
    self.uncles = uncles

The data I use to show the code is correct was grabbed from Etherscan.

Continue reading

How to Build Your Own Blockchain Part 4.1 — Bitcoin Proof of Work Difficulty Explained

If you’re wondering why this is part 4.1 instead of part 4, and why I’m not talking about continuing to build the local jbc, it’s because explaining Bitcoin’s Proof of Work difficulty at a somewhat lower level takes a lot of space. So unlike what this title says, this post in part 4 is not how to build a blockchain. It’s about how an existing blockchain is built.

My main goal of the part 4 post was to have one section on the Bitcoin PoW, the next on Ethereum’s PoW, and finally talk about how jbc is going to run and validate proof or work. After writing all of part 1 to explain how Bitcoin’s PoW difficulty, it wasn’t going to fit in a single section. People, me included, tend get bored in the middle reading a long post and don’t finish.

So part 4.1 will be going through Bitcoin’s PoW difficulty calculations. Part 4.2 will be going through Ethereum’s PoW calculations. And then part 4.3 will be me deciding how I want the jbc PoW to be as well as doing time calculations to see how long the mining will take.

The sections of this post are:

  1. Calculate Target from Bits
  2. Determining if a Hash is less than the Target
  3. Calculating Difficulty
  4. How and when block difficulty is updated
  5. Full code
  6. Final Questions

TL;DR

The overall term of difficulty refers to how much work has to be done for a node to find a hash that is smaller than the target. There is one value stored in a block that talks about difficulty — bits. In order to calculate the target value that the hash, when converted to a hex value has to be less than, we use the bits field and run it through an equation that returns the target. We then use the target to calculate difficulty, where difficulty is only a number for a human to understand how difficult the proof of work is for that block.

If you read on, I go through how the blockchain determines what target number the mined block’s hash needs to be less than to be valid, and how that target is calculated.

Other Posts in This Series

Calculate Target from Bits

In order to go through Bitcoin’s PoW, I need to use the values on actual blocks and explain the calculations, so a reader can verify all this code themselves. To start, I’m going to grab a random block number to work with and go through the calculations using that.

>>>import random
>>> random.randint(0, 493928)
111388

Block number 11138 it is! Back in time to March of 2011 we go.

Continue reading

General Tips for Web Scraping with Python

The great majority of the projects about machine learning or data analysis I write about here on Bigish-Data have an initial step of scraping data from websites. And since I get a bunch of contact emails asking me to give them either the data I’ve scraped myself, or help with getting the code to work for themselves. Because of that, I figured I should write something here about the process of web scraping!

There are plenty of other things to talk about when scraping, such as specifics on how to grab the data from a particular site, which Python libraries to use and how to use them, how to write code that would scrape the data in a daily job, where exactly to look as to how to get the data from random sites, etc. But since there are tons of other specific tutorials online, I’m going to talk about overall thoughts on how to scrape. There are three parts of this post – How to grab the data, how to save the data, and how to be nice.

As is the case with everything, programming-wise, if you’re looking to learn scraping, you can’t just read tutorials and think to yourself that you know how to program. Pick a project, practice grabbing the data, and then write a blog post about what you learned.

There definitely are tons of different thoughts on scraping, but these are the ones that I’ve learned from doing it a while. If you have questions, comments, and want to call me out, feel free to comment, or get in contact!

Grabbing the Data

The first step for scraping data from websites is to figure out where the sites keep their data, and what method they use to display the data on the browser. For this part of your project, I’ll suggest writing in a file named gather.py which should performs all these tasks.

Continue reading

A Practical Use For Python Decorators — Logging, Error Checks, and Timing

When using a Python decorator, especially one defined in another library, they seem somewhat magical. Take for example Flask’s routing mechanism. If I put some statement like @app.route("/") above my logic, then poof, suddenly that code will be executed when I go to the root url on the server. And sure, decorators make sense when you read the many tutorials out there that describe them. But for the most part, those tutorials are just explaining what’s going on, mostly by just printing out some text, but not why you might want to use a decorator yourself.

I was of that opinion before, but recently, I realized I have the perfect use for a decorator in a project of mine. In order to get the content for Product Mentions, I have Python scrapers that go through Reddit looking for links to an Amazon product, and once I find one, I gather up the link, use the Amazon Product API to get information on the product. Once that’s in the database, I use Rails to display the items to the user.

While doing the scraping, I also wanted a web interface so I can check to see errors, check to see how long the jobs are taking, and overall to see that I haven’t missed anything. So along with the actual Python script that grabs the html and parses it, I created a table in the database for logging the scraping runs, and update that for each job. Simple, and does the job I want.

The issue I come across here, and where decorators come into play, is code reuse. After some code refactoring, I have a few different jobs, all of which have the following format: Create an object for this job, commit it to the db so I can see that it’s running in real time, try some code that depends on the job and except and log any error so we don’t crash that process, and then post the end time of the job.

def gather_comments():
  scrape_log = ScrapeLog(start_time=datetime.now(), job_type="comments")
  session.add(scrape_log)
  session.commit()

  try:
    rg = RedditGatherer()
    rg.gather_comments()
  except Exception as e:
    scrape_log.error = True
    scrape_log.error_message = e.message

  scrape_log.end_time = datetime.now()
  session.add(scrape_log)
  session.commit()

def gather_threads():
  scrape_log = ScrapeLog(start_time=datetime.now(), job_type="threads")
  session.add(scrape_log)
  session.commit()

  try:
     rg = RedditGatherer()
     rg.gather_threads()
  except Exception as e:
    scrape_log.error = True
    scrape_log.error_message = e.message

  scrape_log.end_time = datetime.now()
  session.add(scrape_log)
  session.commit()

If you know a bit about how decorators work, you can already see how perfect an opportunity using this concept is here, because decorators allow you to extend and reuse functionality on top of functions you already use. For me, I want to log, time, and error check my scraping, and reusing the same code is not ideal. But a decorator is. Here’s how to write one.

Decorator Time

First thing to do, is write a function, that takes a function as parameter and call that function at the appropriate time. Since the work of the functions above is done with the same format, this turns out really nice.

Continue reading

Running Python Background Jobs with Heroku

Recently, I’ve been working on a project that scrapes Reddit looking for links to products on Amazon. Basically the idea being that there’s valuable info in what people are linking to and talking about online, and a starting point would be looking for links to Amazon products on Reddit. And the result of that work turned into Product Mentions.

To build this, and I can talk more about this later, I have two parts. First being a basic Rails app that displays the products and where they’re talked about, and the second being a Python app that does the scraping, and also displays the scraping logs for me using Flask. I thought of just combining the two functionalities at first, but decided It was easier in both regards to separate the two functionalities. The scraper populates the database, and the Rails app displays what’s in there. I hosted the Rails app on Heroku, and after some poking around, decided to also run the Python scraper on Heroku as well (for now at least!)

Also, if at this point, you’re thinking to yourself, “why the hell is he using an overpriced, web app hosting service like Heroku when there are so many other options available?” you’re probably half right, but in terms of ease of getting started, Heroku was by far the easiest PaaS to get this churning. Heroku is nice, and this set up is really simple, especially compared to some of the other PaaS options out there that require more configuration. You can definitely look for different options if you’re doing a more full web crawl, but this’ll work for a lot of purposes.

So what I’m going to describe here today, is how I went about running the scrapers on Heroku as background jobs, using clock and worker processes. I’ll also talk a little about what’s going on so it makes a little more sense than those copy paste tutorials I see a lot (though that type of tutorial from Heroku’s docs is what I used here, so I can’t trash them too badly!).

worker.py

First file you’re going to need here is a worker file, which will perform the function that it sees coming off a queue. For ease, I’ll name this worker.py file. This will connect to Redis, and just wait for a job to be put on the queue, and then run whatever it sees. First, we need rq the library that deals with Redis in the background (all of this is assuming you’re in a virtualenv

$ pip install rq
$ pip freeze > requirements.txt

This is the only external library you’re going to need for a functioning worker.py file, as specified by the nice Heroku doc. This imports the required objects from rq, connects to Redis using either an environment variable (that would be set in a production / Heroku environment), creates a worker, and then calls work. So in the end, running python worker.py will just sit there waiting to get jobs to run, in this case, scraping Reddit. We also have ‘high’ ‘default’ and ‘low’ job types, so the queue will know which ones to run first, but we aren’t going to need that here.

import os

import redis
from rq import Worker, Queue, Connection

listen = ['high', 'default', 'low']

redis_url = os.getenv('REDISTOGO_URL', 'redis://localhost:6379')

conn = redis.from_url(redis_url)

if __name__ == '__main__':
 with Connection(conn):
 worker = Worker(map(Queue, listen))
 worker.work()

clock.py

Now that we have the worker set up, here’s the clock.py file that I’m using to do the scraping. Here, it imports the conn variable from the worker.py file, uses that to make sure we’re connected to the same Redis queue. We also import the functions that use the scrapers from run.py, and in this file, create functions that will enqueue the respective functions.  Then we use apscheduler to schedule when we want to call these functions, and then start the scheduler. If we run python clock.py, we scheduler will run in perpetuity (hopefully), and then will call the correct code on the intervals we defined.

Continue reading

Classifying Amazon Reviews with Scikit-Learn — More Data is Better Turns Out

Last time, I went through some basics of how naive Bayes algorithm works, and the logic behind it, and implemented the classifier myself, as well as using the NLTK. That’s great and all, and hopefully people reading it got a better understanding of what was going on, and possibly how to play along with classification for their own text documents.

But if you’re looking to train and actually deploy a model, say, a website where people can copy paste reviews from Amazon and see how our classifier performs, you’re going to want to use a library like Scikit-Learn. So with this post, I’ll walk through training a Scikit-Learn model, testing various classifiers and parameters, in order to see how we do, and also at the end, will have an initial, version 1, of a Amazon review classifier that we can use in a production setting.

Some notes before we get going:

  • For a lot of the testing, I only use 5 or 10 of the full 26 classes that are in the dataset.
  • Keep in mind, that what works here might not be the same for other data sets. We’re specifically looking at Amazon product reviews. For a different set of texts (you’ll also see the word corpus being thrown around), a different classifier, or parameter sets might be used.
  • The resulting classifier we come up with is, well, really really basic, and probably what we’d guess would perform the best if we guessed what would be the best at the onset. All the time and effort that goes into checking all the combinations
  • I’m going to mention here this good post that popped up when I was looking around for other people who wrote about this. It really nicely outlines going how to classify text with Scikit-learn. To reduce redundancy, something that we all should work towards, I’m going to point you to that article to get up to speed on Scikit-learn and how it can apply to text. In this article, I’m going to start at the end of that article, where we’re working with Scikit-learn pipelines.

As always, you can say hi on twitter, or yell at me there for messing up as well if you want.

How many grams?

First step to think about is how we want to represent the reviews in naive Bayes world, in this case, a bag of words / n-grams. In the other post, I simply used word counts since I wasn’t going into how to make the best model we could have. But besides word counts, we can also bump up the representations to include something called a bigram, which is a two word combos. The idea behind that is that there’s information in two word combos that we aren’t using with just single words. With Scikit-learn, this is very simple to do, and they take care of it for you. Oh, and besides bigrams, we can say we want trigrams, fourgrams, etc. Which we’ll do, to see if that improves performance. Take a look at the wikipedia article for n-grams here.

For example is if a review mentions “coconut oil cream”, as in some sort of face cream (yup, I actually saw this as a mis-classified review), simply using the words and we might get a classification of food since we just see “coconut” “oil” and “cream”. But if we use bigrams as well as the unigrams, we’re also using “coconut oil” and “oil cream” as information. Now this might not get us all the way to a classification of beauty, but it could tip us over the edge.

Continue reading

Practical Naive Bayes — Classification of Amazon Reviews

If you search around the internet looking for applying Naive Bayes classification on text, you’ll find a ton of articles that talk about the intuition behind the algorithm, maybe some slides from a lecture about the math and some notation behind it, and a bunch of articles I’m not going to link here that pretty much just paste some code and call it an explanation.

So I’m going to try to do a little more here, by hopefully writing and explaining enough, is let you yourself write a working Naive Bayes classifier.

There are three sections here. First is setup, and what format I’m expecting your text to be in for the classification. Second, I’ll talk about how to run naive Bayes on your own, using slow Python data structures. Finally, we’ll use Python’s NLTK and it’s classifier so you can see how to use that, since, let’s be honest, it’s gonna be quicker. Note that you wouldn’t want to use either of these in production, so look for a follow up post about how you might go about doing that.

As always, twitter, and check out the full code on github.

Setup

Data from this is going to be from this UCSD Amazon review data set. I swear one of the biggest issues with running these algorithms on your own is finding a data set big and varied enough to get interesting results. Otherwise you’ll spend most of your time scraping and cleaning data that by the time you get to the ML part of the project, you’re sufficiently annoyed. So big thanks that this data already exists.

You’ll notice that this set has millions of reviews for products across 24 different classes. In order to keep the complexity down here (this is a tutorial post after all), I’m sticking with two classes, and ones that are somewhat far enough different from each other to show that classification works, we’ll be classifying baby reviews against tools and home improvement reviews.

Preprocessing

First thing I want to do now, after unpacking the .gz file, is to get a train and test set that’s smaller than the 160,792 and 134,476 of baby and tool reviews respectively. For purposes here, I’m going to use 1000 of each, with 800 used for training, and 200 used for testing. The algorithms are able to support any number of training and test reviews, but for demonstration purposes, we’re making that number lower.

Check the github repo if you want to see the code, but I wrote a script that just takes the full file, picks 1000 random numbers, segments 800 into the training set, and 200 into the test set, and saves them to files with the names “train_CLASSNAME.json” and “test_CLASSNAME.json” where classname is either “baby” or “tool”.

Also, the files from that dataset are really nice, in that they’re already python objects. So to get them into a script, all you have to do is run “eval” on each line of the file if you want the dict object.

Features

There really wasn’t a good place to talk about this, so I’ll mention it here before getting into either of the self, and nltk running of the algorithm. The features we’re going to use are simply the lowercased version of all the words in the review. This means, in order to get a list of these words from the block of text, we remove punctuation, lowercase every word, split on spaces, and then remove words that are in the NLTK corpus of stopwords (basically boring words that don’t have any information about class).

from nltk.corpus import stopwords
STOP_WORDS = set(stopwords.words('english'))
STOP_WORDS.add('')
def clean_review(review):
  exclude = set(string.punctuation)
  review = ''.join(ch for ch in review if ch not in exclude)
  split_sentence = review.lower().split(" ")
  clean = [word for word in split_sentence if word not in STOP_WORDS]
  return clean

Realize here that there are tons of different ways to do this, and ways to get more sophisticated that hopefully can get you better results! Things like stemming, which takes words down to their root word (wikipedia gives the example of “stems”, “stemmer”, “stemming”, “stemmed” as based on “stem”). You might want to include n-grams, for an n larger than 1 in our case as well.

Basically, there’s tons of processing on the text that you could do here. But since this I’m just talking about how Naive Bayes works, I’m sticking with simplicity. Maybe in the future I can get fancy and see how well I can do in classifying these reviews.

Ok, on to the actual algorithm.

Continue reading

Getting Song Lyrics from Genius’s API + Scraping

Genius is a great resource. At a high level, Genius has song lyrics and allows users to comment on what the artist meant. Starting as Rap Genius, where users annotated rap lyrics, the site rebranded as “Genius”, allowing all songs to be talked about. According to their website, “Genius is the world’s biggest collection of song lyrics and crowdsourced musical knowledge.” Recently even, they’ve moved to allowing annotations of pretty much anything posted online.

I’ve have used it a bunch recently while trying to figure out what the hell Frank Ocean was trying to say in his new album Blond. Users of the site explained tons of Frank’s references that went whoosh right over my head when I listened the first time and all the times after.

And recently, when I had some ideas for mini projects using song lyrics, I was pretty happy to find that Genius had a API for getting the data on their site. Whenever I’m trying to get data elsewhere, I’m much happier with an API, or at least being able to get it from JSON responses rather than parsing HTML. It’s just cleaner to look at, and with an API, I can expect good documentation that isn’t going to change with css updates.

Their API docs looked pretty good at first glance, with endpoints for artists, songs, albums, and annotations. One things I did notice was that they don’t have an artist entry point. A lot of what I want to do is artist based, meaning I need to know the artist id for everyone. And in order for me to get that, I have to search the artist, grab a song from the results, hit the song endpoint for that song’s information, and then grab the artist id from there. It’d be nice if you could specify what I’m searching for when I hit the search endpoint so I don’t have to go through that whole charade just to get the artist. But that’s a blog post for another time. Overall, they give out tons of information pretty easily.

But why, Genius, why don’t you have an endpoint for getting the raw lyrics of a song?! You have a songs endpoint on the API, and you give me a ton of information from there — the song title, album name, featured artists on the song, number of annotations, images associated with the song, album information, page views for that song, and a whole host of more data. But the one thing you don’t give me, and the one thing that people using the API probably want the most, is plain text lyrics!

Pre-Genius, I was stuck with these jankily laid out sites with super old looking css that would have the lyrics, but not necessarily correct, and definitely no annotations. Those sites are probably easily scrapeable considering their simplicity, but searching for the right song would be more difficult, and the lyrics might not be correct. Genius solved this all now for a web user, but dammit, I want the lyrics in the API!

Now you might be able to get the entire set of lyrics by using the annotations endpoint, which had information about all the annotations for a certain song or article, but that would require a song to have annotations for every word in the song. For someone like Chance the Rapper who like Frank Ocean (and most other hip hop artists uses tons of references in his lyrics, having complete annotations might not be an issue. But of Jake Owen, who’s new single “American Country Love Song” has probably the most self explanatory lyrics ever (sorry for throwing you under the bus here, Jake. Still a fan), there’s no need to annotate anything, and getting the lyrics in this manner wouldn’t work.

The lyrics are there on the internet however, and I can get at them by hitting the song endpoint, and using the web url that it returns. The rest of this article will show you how to do that using Python and it’s requests and BeautifulSoup libraries. But I don’t have to have to resort to HTML parsing, and I don’t think Genius wants users doing that either.

I’m left here wondering why they don’t want to give up the lyrics so easily, and I really don’t have much to go on. Genius’s goal seems to be wanting to annotate the internet. It has already moved on from their initial site of Rap Genius, into all music, and now into speech transcripts, as well as pretty much any other content on the web. Their value comes from those annotations themselves, not the information they’re annotating. They give away the annotations freely, but not the information (lyrics) in this case.

Enough speculation on why Genius doesn’t spit out the lyrics to a song when you get the other information. And as I’m writing this, I realize I easily could have overlooked something in their API and Genius might return the full lyrics, but I overlooked it. In that case, half of this article will be pointless and I’ll hold my head in shame from yelling at them like I did.

For purposes here, I’m going to show you how to get the song lyrics from Genius if you have the song title, and also talk through my process of getting there.

Note of clarification, just to make sure I’m not violating their terms of service, this post is for informational purposes only. Hopefully this can help programmers out there learn. Don’t do something bad with this knowledge. Code time!

First thing you’re going to need is an account set up with Genius. You can sign up from the upper right hand corner of the genius.com homepage. After that, navigate to the api docs where you’ll then see your Bearer token that you’ll need for all API requests.

I’m using the requests library here, and once you have the bearer token, here’s what all the API requests to Genius should look like if, for example, you’re searching for a song title.

import requests

#TOKEN below should be the string that the API docs tells you
#Clearly I'm not giving mine out here on the internet. That'd be dumb
base_url = "http://api.genius.com"
#Key line below here when, this is how to authorize your request when
#using the API
headers = {'Authorization': 'Bearer TOKEN'}
search_url = base_url + "/search"
song_title = "In the Midst of It All"
params = {'q': song_title}
response = requests.get(search_url, params=params, headers=headers)

The response, according to the Genius API, would be a list of songs that match that string passed in, with the first result being the Tom Misch song that I was going for. By changing around the url that is passed into the request method, you can access all the information that Genius supplies from the API (pretty much everything but the lyrics).

Continue reading

The Special Relationship Between Noodles and Qdoba

I’ve had a theory that for every Noodles, there’s a Qdoba that’s right next door. It might be some sort of selection bias however, since I can think of a couple locations where they’re directly next to each other. To me, Noodles and Qdoba have a special relationship, at least compared to other restaurants. I figured now was about the time I should test this, and I can use Chipotle to test.

The question is: Which restaurant is more special to Noodles, Qdoba or Chipotle?

Finding the Noodles, Qdoba, and Chipotle locations

Initially, I went to Noodle’s website and their locations page and was planning on getting the data from there. But what I realized was that it just used the Google Maps API to get it’s data, so I might as well just go right to the Google source and use their api correctly.

Google’s docs are pretty good in this case, and after grabbing an API key, I started in on finding the Dobas. For prototyping, I just started with the latitude and longitude of Milwaukee, my home town, and a place where I know there multiple Qdobas / Noodles pairs.

import requests
url = 'https://maps.googleapis.com/maps/api/place/nearbysearch/json'
location_milwaukee = '43.0389,-87.9065' #Milwaukee
params = {}
params['key'] = GOOGLE_PLACES_API
params['type'] = 'restaurant'
params['radius'] = 50000 #in meters, and going be an issue
params['keyword'] = 'Qdoba'
params['location'] = location
r = requests.get(url, params=params)
results = r.json()['results']
print results

Put your Google Places API key in the ‘key’ param, run those lines of code (assuming you pip installed requests) and you’ll see 20 Qdoba locations along with some extra information spit out on your console.

Issues

Two obstacles came up with this part of the project – one simple to fix, the other decently tough. First the simple one.

In order to limit the amount of information coming across the wire, Google limits each API request to 20 results. When there are more than 20 results they find, they also pass back in the json a param named “next_page_token”. So when we see this param passed back, we need to stick with the same location, and add the param “pagetoken” and hit the same endpoint. There’s also a time aspect to this request where we need to wait a couple seconds before hitting the endpoint to grab the remaining locations. Not too bad.

Second issue here, and somewhat of an annoying one, is the radius parameter. 50 km is not quite the size of the entire US. This is actually a really interesting problem that, after talking with work colleagues, there isn’t a straightforward solution. What we really need here, is a set of latitudes and longitudes where, with the 50 km radius, will cover the entirety of the United States. Sure you could put a location every miles or so, but that would take forever to search for. So instead of finding a solution to this problem isn’t in the scope of this article (maybe later). Instead, I found this nice gist of the top 246 metro locations in the US and their latitude and longitudes and am just going to use that and hope it covers enough of the country to be useful.

Complete code for this part of the project includes writing the locations of the restaurants to a tab separated values (tsv) file. Normally would use a csv, but since the addresses have commas in them, it could get confusing.

from major_city_list import major_cities

keyword_qdoba = 'Qdoba Mexican Eats'
keyword_noodles = 'Noodles & Company'
keyword_chipotle = 'Chipotle'
search_keywords = [keyword_qdoba, keyword_noodles, keyword_chipotle]

params = {}
params['key'] = GOOGLE_PLACES_API
params['type'] = 'restaurant'
params['radius'] = 50000
for keyword in search_keywords:
  params['keyword'] = keyword
  keyword_info = {}
  for city in major_cities:
    print city["city"]
    location = "%s,%s" % (city["latitude"], city["longitude"])
    params['location'] = location
    while True:
      r = requests.get(url, params=params)
      results = r.json()['results']
      num_results = len(results)
      print "results: %s" % num_results
      for result in results:
        lat = result["geometry"]["location"]["lat"]
        lng = result["geometry"]["location"]["lng"]
        key = "%s%s" % (lat, lng * -1)
        address = result["vicinity"]
        info = {"lat": lat, "lng": lng, "address": address}
        keyword_info[key] = info
        try:
          next_page_token = r.json()['next_page_token']
          params["pagetoken"] = next_page_token
          time.sleep(2)
        except KeyError:
          params.pop("pagetoken", None)
          break

 filename = "%s.tsv" % keyword
 filename = filename.lower().replace(" ", "_")
 with open(filename, 'wb') as tsvfile:
   writer = csv.writer(tsvfile, delimiter='\t')
   for key, info in keyword_info.iteritems():
     writer.writerow([info['lat'],info['lng'],info['address']])

Final thing to point out here is about why I have this be a multi step process. I could have written a script that does this part, and then all the rest of the project at once. But you’ll find that when working on things and bugfixing, it’s better to split tasks up, save the results, and then use those results without having to go back out to the internet.

Finding nearest companion

Step two of this process here is finding the closest Qdoba and Chipotle for each Noodles. With that information, we can figure out how far away the nearest companion is. At first, I was tempted to go right back to the Google Places API since, well, it was designed for this purpose. However first, I decided to see if I could brute force it with the n^2 loop over every location and find the shortest distance algorithm. Turns out that was a great decision because it was way quicker and more accurate.

Code steps are 1) Read in the noodles.tsv file generated above, 2) read in the chipotle and qdoba .tsv files, 3) for each Noodles, loop the entire other file and store the closest location, 4) store that information in another tsv file. In this case, code is easier to figure out than explanation.

keywords = ['chipotle', 'qdoba']
noodles_locations = []
filename = "noodles.tsv"
with open(filename, 'rb') as tsvfile:
  reader = csv.reader(tsvfile, delimiter='\t')
  for row in reader:
    noodles_locations.append(row)
for keyword in keywords:
  information = []
  filename = "%s.tsv" % keyword
  keyword_locations = []
  with open(filename, 'rb') as tsvfile:
    reader = csv.reader(tsvfile, delimiter='\t')
    for row in reader:
      keyword_locations.append(row)
  count = 0
  for noodle_location in noodles_locations:
    print count
    test_loc = (noodle_location[0], noodle_location[1])
    best_distance = 100000 #something large
    for location in keyword_locations:
      found_loc = (location[0], location[1])
      distance = vincenty(test_loc, found_loc).miles
      if distance < best_distance:
        best_distance = distance
        best_location = [location[0], location[1], location[2]]
    info_row = [noodle_location[0], noodle_location[1], noodle_location[2], best_location[0], best_location[1], best_location[2]]
    information.append(info_row)
    count += 1
    filename = "noodles_closest_%s.tsv" % keyword
    with open(filename, 'wb') as tsvfile:
      writer = csv.writer(tsvfile, delimiter='\t')
      for info in information:
        writer.writerow(info)

Analyze!

For my dumb theory to be true, there needs to be a disproportionate number of Qdobas and Noodles within walking distance of each other, and specifically, right next to each other compared to Chipotle.

After analyzing the data, I’m totally right.

I found 418 Noodles, 790 Chipotles, and 618 Qdobas. Even with the extra 172 Chipotles, there’s a Qdoba closer to a Noodles than there is a Chipotle.

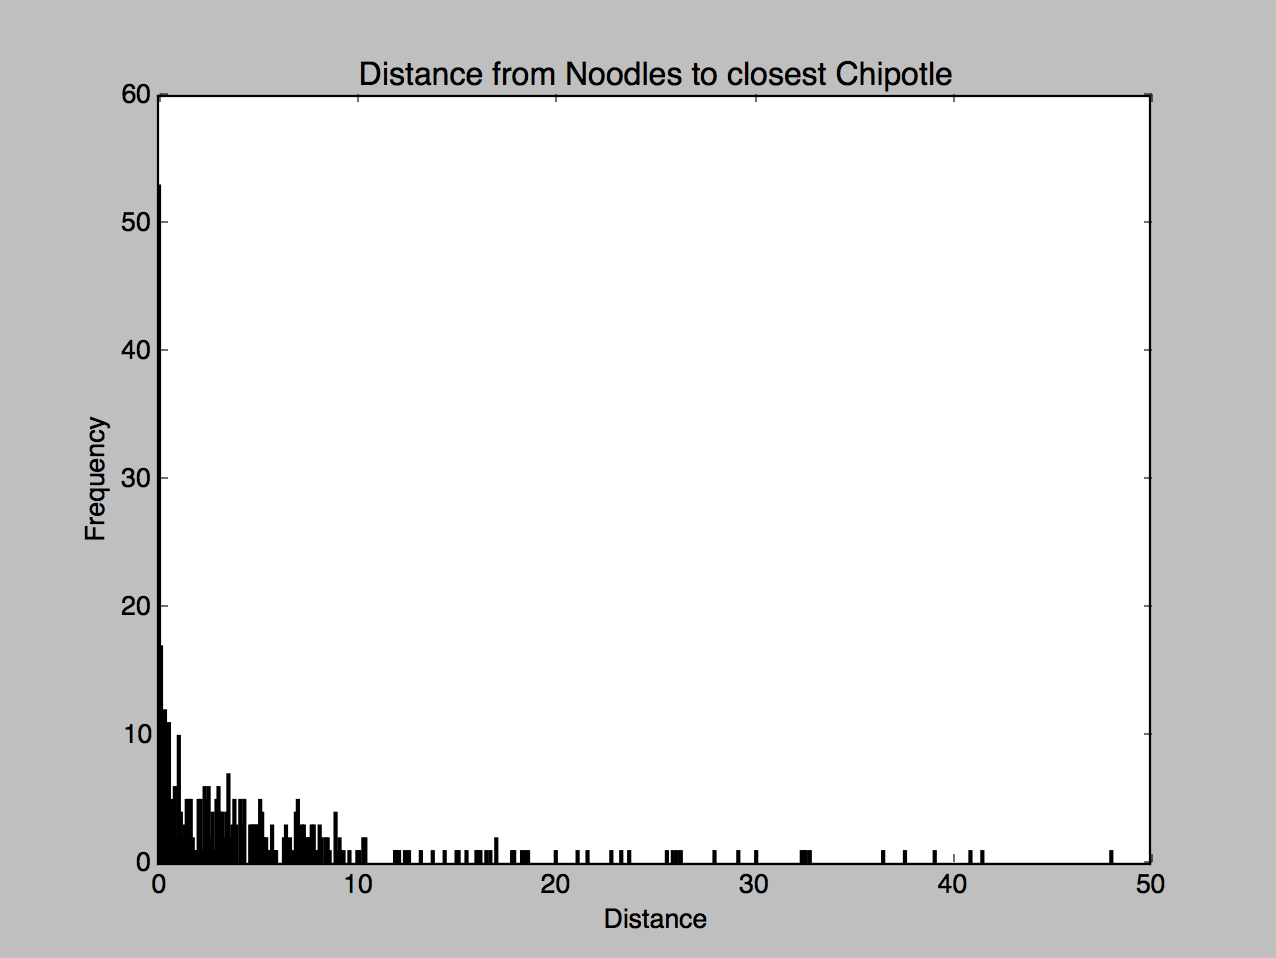
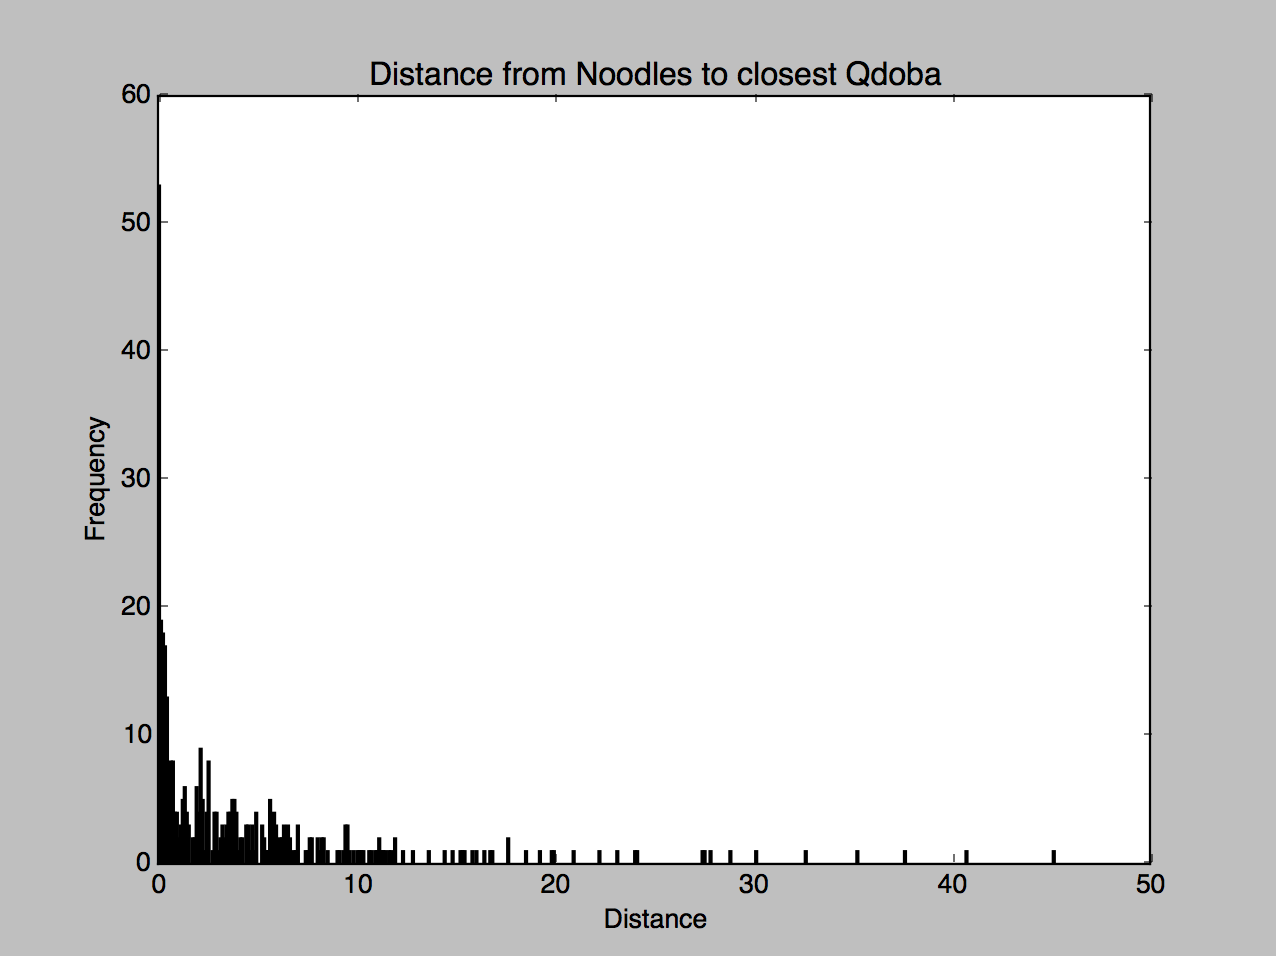
Some numbers. If you’re at a Noodles, there’s a 12.7% chance you’re within 0.1 miles of a Qdoba, 19.9% chance you’re within 0.25 miles, and 35.9% chance you’re within 1 mile. Chipotle has percentages of 6.4%, 12.7%, 30.6% respectively.

Check out the histograms:

chipotle qdoba

While not much of a difference, you can see a little more action on the left side of the Qdoba histogram compared to the Chipotle one.

As a final, final test, I went through each Noodle location again, found the nearest Qdoba and nearest Chipotle and counted the number of Noodles that had a Qdoba closer, and Noodles that had Chipotle closer. Final tally, 214 had a Qdoba closer, 204 had a Chipotle closer.

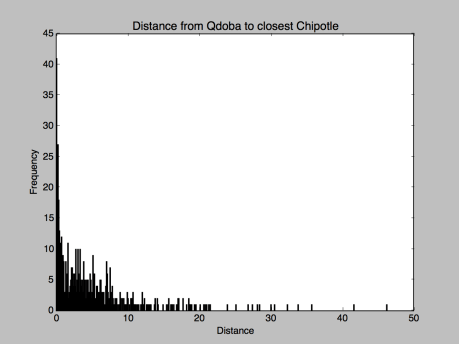
So how close are Qdobas and Chipotles from each other?

For fun, I ran the code to see how close the nearest Chipotle was from each Qdoba.

6.6% Qdobas had a Chipotle within 0.1 miles, 12.8% had one within 0.25 miles, and 28% within 1 mile. Semi-surprising that it was this high, but I guess people don’t want to go far for food.

The histogram is definitely more telling that Chipotles are further apart. Check out the y axis scaling here.

Screen Shot 2016-05-02 at 9.04.04 PM

What’s the point of this?

Knowing this kind of information really isn’t all that useful. Fun, sure, but not too particularly useful. But what it does show is how powerful knowledge of the internet and programming can be. In just a short amount of time, we went from a dumb theory about restaurants to finding an answer. Also, maybe you’re looking to open a Qdoba somewhere in the US, and want to know if there’s a lonely Noodles that needs a companion!

Follow on twitter, and get in contact if you have information you want on the internet. I can help you out!