In part 1, we went through have have basic DAGs that read, logged, and write to custom files, and got an overall sense of file location and places in Airflow. A lot of the work was getting Airflow running locally, and then at the end of the post, a quick start in having it do work.
In part 2 here, we’re going to look through and start some read and writes to a database, and show how tasks can run together in a directed, acyclical manner. Even though they’ll both be with a single database, you can think of stretching them out in other situations.
Again, this post will assume you’re going through and writing this code on your own with some copy paste. If you’re on the path of using what I have written, checkout the github repo here.
Creating database
This post is going to go through and write to postgres. We already created a database for Airflow itself to use, but we want to leave that alone.
So before we get to any of the python code, go and create the new database, add a new user with password, and then create the dts (short name for datetimes, since that’s all we’re doing here) table.
bigishdata=> create table dts (id serial primary key, run_time timestamp, execution_time timestamp);
CREATE TABLE
bigishdata=> \dt
            List of relations
 Schema | Name  | Type  |     Owner
--------+-------+-------+----------------
 public | dts   | table | bigishdatauser
(1 rows)

bigishdata=# \d dts
                                          Table "public.dts"
     Column     |            Type             | Collation | Nullable |             Default
----------------+-----------------------------+-----------+----------+---------------------------------
 id             | integer                     |           | not null | nextval('dts_id_seq'::regclass)
 run_time       | timestamp without time zone |           |          |
 execution_time | timestamp without time zone |           |          |
Indexes:
    "dts_pkey" PRIMARY KEY, btree (id)
Adding the Connection
Connections is well named term you’ll see all over in Airflow speak. They’re defined as “[t]he connection information to external systems” which could mean usernames, passwords, ports, etc. for when you want to connect to things like databases, AWS, Google Cloud, various data lakes or warehouses. Anything that requires information to connect to, you’ll be able to put that information in a Connection.
With airflow webserver running, go to the UI, find the Admin dropdown on the top navbar, and click Connections. Like example DAGs, you’ll see many default Connections, which are really great to see what information is needed for those connections, and also to see what connections are available and what platforms you can move data to and from.
Take the values for the database we’re using here — the (local)host, schema (meaning database name), login (username), password, port — and put that into the form shown below. At the top, you’ll see Conn Id, and in that input create a name for the connection. This name is clearly important, and you’ll see that we use that in order to say which Connection we want.

When you save this, you can go to the Airflow database, find the connection table, and you can see the see the values you inputted in that form. You’ll also probably see that your password is there in plain text. For this post, I’m not going to talk about encrypting it, but you’re able to do that, and should, of course.
One more thing to look at is in the source code, the Connection model, form, and view. It’s a flask app! And great to see the source code to get a much better understanding for something like adding information for a connection.
Hooks
In order to use the information in a Connection, we use what is called a Hook. A Hook takes the information in the Connection, and hooks you up with the service that you created the Connection with. Another nicely named term.
The postgres hook we’ll be using is defined as follow.
from airflow.hooks.postgres_hook import PostgresHook
pg_hook = PostgresHook(postgres_conn_id='postgres_bigishdata')
You can take a look at the source code for the Hook and you’ll see that the PostgresHook inherits from DbApiHook, which has functions such as run, insert_rows, and get_cursor, that all come from SqlAlchemy functionality. Another example of how seeing the code there makes me so much more comfortable using the hook and trusting that you know what the code is doing and how to use it.
The readability and straightforwardness of the code is one of the best things I’ve found with Airflow.
DAG
With the Connection and Hook taken care of, we’ll write the DAG tasks that instead of writing to the file like the first time, will write these datetimes to the database. For me, I copied the writing_to_file.py to writing_to_pg.py and changed the python_callable to
from airflow.hooks.postgres_hook import PostgresHook
pg_hook = PostgresHook(postgres_conn_id='postgres_bigishdata')
....

def write_to_pg(**kwargs):
    execution_time = kwargs['ts']
    run_time = dt.datetime.utcnow()
    print('Writing to pg', runtime, execution_time)
    dts_insert = 'insert into dts (runtime, execution_time) values (%s, %s)'
    pg_hook.run(dts_insert, parameters=(runtime, execution_time,))

....

dag = DAG('writing_to_pg',  # note the difference of the DAG name. This is important to keep separate for now, and also in the future with versions.
          default_args=default_args,
          start_date=dt.datetime.now(),
          schedule_interval=dt.timedelta(seconds=10)
          )
....
In the function, We get the times, print them to go to the log, write the SQL insert statement, and call run with the statement and the tupled parameters.
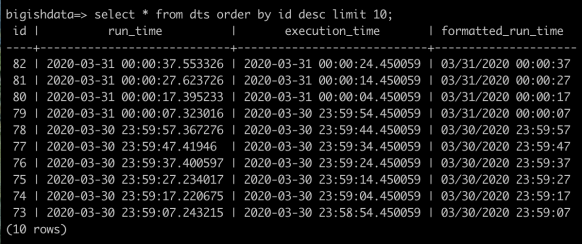
Restart the scheduler, which will then pickup the new DAG and put it in the DAG table of the Airflow database. Now if you go back to the main DAG page in the Airflow UI, you should see writing_to_pg show up. Go ahead and turn on the task, and go to psql and select * from dts and keep watching that as the tasks run. You’ll start to see them show up every 10 seconds. After a minute, your query will show something like this, again, with the execution times exactly 10 seconds apart, runtime slightly different (and yes, more than 13 seconds apart. Keep that in mind still).

That last paragraph was pretty in depth on how to get the DAG to run, so don’t feel bad if it didn’t start running correctly right away, but you’ll get there.
Downstream DAG
We’re finally to the point where we can have a downstream operator instead of the single task. Look back to what was done in part 1 and so far in part 2. All this work and setup to write an incredibly simple function. Now you can see why people don’t always feel the need to run Airflow. That said, keep going.
The task we’ll create will, after the upstream writing_to_pg runs, take that new row, format the run_time, and update the row with the formatted_run_time. We’re still going simple.
First is to add the formatted_run_time column to the dts table.
bigishdata=> alter table dts add column formatted_run_time varchar;
ALTER TABLE
bigishdata=> \d dts
                                            Table "public.dts"
       Column       |            Type             | Collation | Nullable |             Default
--------------------+-----------------------------+-----------+----------+---------------------------------
 id                 | integer                     |           | not null | nextval('dts_id_seq'::regclass)
 run_time           | timestamp without time zone |           |          |
 execution_time     | timestamp without time zone |           |          |
 formatted_run_time | character varying           |           |          |
Indexes:
    "dts_pkey" PRIMARY KEY, btree (id)
In this case, we’re going to add SqlAlchemy object to represent the dts, instead of using sql string statements. This will give us back an object with a query, and make it a little clearer.
In writing_to_pg_dag.py, add the following.
....
from sqlalchemy.ext.declarative import declarative_base
from sqlalchemy import Column, Integer, String, DateTime
from sqlalchemy.orm import sessionmaker

....
Base = declarative_base()

class Dts(Base):
    __tablename__ = 'dts'

    id = Column(Integer, primary_key=True)
    run_time = Column(DateTime)
    execution_time = Column(DateTime)
    formatted_runtime = Column(String)

    def __repr__(self):
        return f"<Dts(id={self.id}, runtime={self.runtime})>"
....
Now we’re going to create the python_callable. In this function, we’re going to query for the most recent dts row that doesn’t have a formatted run_time, do the formatting, and then rewrite to the database. So below the SqlAlchemy object you created, add the following. What we’re going to do is get_sqlalchemy_engine through the PostgresHook, (which is a subclass of the DbApiHook,) get a session from that, and do the query and update.
# These variables can go anywhere, but we're making them globals in the file for now.

from sqlalchemy.orm import sessionmaker

...

pg_hook = PostgresHook(postgres_conn_id='postgres_bigishdata')
engine = pg_hook.get_sqlalchemy_engine()
Session = sessionmaker(bind=engine)
session = Session() #session for querying

...

def format_dt(ds, **kwargs):
    recent_dt = session.query(Dts).filter(Dts.runtime.isnot(None)).order_by(Dts.runtime.desc()).first()
    print(recent_dt) # put in the logs
    formatted_runtime = recent_dt.runtime.strftime('%m/%d/%Y %H:%M:%S')
    recent_dt.formatted_runtime = formatted_runtime
    session.add(recent_dt)
    session.commit()
What we have here is a function that uses a SqlAlchemy session to query for an object, format the time, add, and commit.
The last step of this formatting is to add the operator to the DAG.
...

format_run_time_pg_operator = PythonOperator(task_id='format_runtime_pg',
                                             python_callable=format_run_time_pg,
                                             provide_context=True,
                                             dag=dag)

write_to_pg_operator >> format_run_time_pg_operator
With the scheduler running, go back to the UI and turn on the writing_to_pg DAG again. What will happen is the datetimes will be set as they were before but when we query, right away we’ll see the formatted date time (and also when I was writing this after work).
XCom
I’m guessing you noticed this, but the query above is asking for the most recent value that was stored in the databases, which is pretty dumb and not useful.
Imagine it’s a table for runtime logs of many different services, and you want to put that log, and then after, do something else with the log. We can have one task for inserting the value, but the next task will want to know exactly which value to continue using. This is where XComs come in to play.
XComs “let tasks exchange messages, allowing more nuanced forms of control and shared state“. But when reading more about these, you’ll see that Airflow doesn’t really like XComs being used.
This is a subtle but very important point: in general, if two operators need to share information, like a filename or small amount of data, you should consider combining them into a single operator. If it absolutely can’t be avoided, Airflow does have a feature for operator cross-communication called XCom that is described elsewhere in this document.
I’ll tend to disagree with this however. For example, with web scraping, I want to get the file and put it in some directory, local or s3. Then I want to go through the info in that html. I don’t want to have that all in one Operator because then, what’s the point? If each task is thought about as moving data from one place to another, then sure, we can say we want it from a webservice to a database, but there are step in between, and it should be considered more than ok to pass values between tasks.
Anyway, back to the code. Let’s copy the write_to_pg.py file, rename it as write_to_pg_xcom.py, and change the code around with two new PythonOperators. First will add the times, commit them, and then use xcom_push to pass the new id of that row in the database. The second Operator will xcom_pull that id, query for that row, format the time, and update.
def write_to_pg_xcom(**kwargs):
    run_time = dt.datetime.utcnow()
    execution_time = kwargs['ts']
    print('Writing to pg', run_time, execution_time)
    new_dt = Dts(run_time=run_time, execution_time=execution_time)
    session.add(new_dt)
    session.commit()  # Flushing means commit and refresh, so new_dt has the assigned id
    print(new_dt)
    kwargs['ti'].xcom_push(key='inserted_id', value=new_dt.id)


def format_run_time_pg_xcom(**kwargs):
    inserted_id = kwargs['ti'].xcom_pull(task_ids='write_to_pg_xcom', key='inserted_id')
    print(inserted_id)
    recent_dt = session.query(Dts).get(inserted_id)
    print(recent_dt)  # put in the logs
    formatted_run_time = recent_dt.run_time.strftime('%m/%d/%Y %H:%M:%S')
    recent_dt.formatted_run_time = formatted_run_time
    session.commit()

....

write_to_pg_xcom_operator = PythonOperator(task_id='write_to_pg_xcom',
                                           python_callable=write_to_pg_xcom,
                                           provide_context=True,
                                           dag=dag)
format_run_time_pg_xcom_operator = PythonOperator(task_id='format_run_time_pg_xcom',
                                                  python_callable=format_run_time_pg_xcom,
                                                  provide_context=True,
                                                  dag=dag)

write_to_pg_xcom_operator >> format_run_time_pg_xcom_operator
Go back to the UI, click the switch to start the run, wait for a little for the tasks to start running, then go and query the DB, and reload the tree page in the UI and you’ll see the tasks running and completing.
As a final reference to XCom intro, if you go back to the Airflow database, find the xcom table, you can see that the info is being stored.
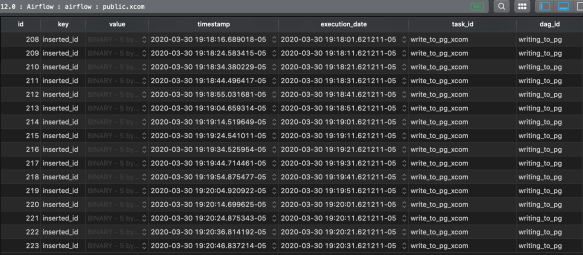
For this task push, value column is where the database id is being stored. It’s a bytea column of the pickled value, you pushed, and converting to bytes. Keep this in mind about sending large amounts of information between tasks. You can do tons of things with the data, so almost always better to put the data somewhere and send id or filename to the next task.
Summary
At the start, we had a DAG with a single task that wrote the run and execution times to a file. Continuing to the end of this post, we created a DAG with two tasks, one writes the times to Postgres, and the other reads those times and writes them back.
Next, in post 3, we’re going to make a bigger jump. I’m a big fan of webscraping, so we’re going to scrape fake blog posts (as if they had deeper meaning than what I write), save the html in s3, then get the post information like titles and posted at dates, structure it, and put it in postgres.

Was there ever a Part 3??
LikeLike