Recently, I’ve been working on a project that scrapes Reddit looking for links to products on Amazon. Basically the idea being that there’s valuable info in what people are linking to and talking about online, and a starting point would be looking for links to Amazon products on Reddit. And the result of that work turned into Product Mentions.
To build this, and I can talk more about this later, I have two parts. First being a basic Rails app that displays the products and where they’re talked about, and the second being a Python app that does the scraping, and also displays the scraping logs for me using Flask. I thought of just combining the two functionalities at first, but decided It was easier in both regards to separate the two functionalities. The scraper populates the database, and the Rails app displays what’s in there. I hosted the Rails app on Heroku, and after some poking around, decided to also run the Python scraper on Heroku as well (for now at least!)
Also, if at this point, you’re thinking to yourself, “why the hell is he using an overpriced, web app hosting service like Heroku when there are so many other options available?” you’re probably half right, but in terms of ease of getting started, Heroku was by far the easiest PaaS to get this churning. Heroku is nice, and this set up is really simple, especially compared to some of the other PaaS options out there that require more configuration. You can definitely look for different options if you’re doing a more full web crawl, but this’ll work for a lot of purposes.
So what I’m going to describe here today, is how I went about running the scrapers on Heroku as background jobs, using clock and worker processes. I’ll also talk a little about what’s going on so it makes a little more sense than those copy paste tutorials I see a lot (though that type of tutorial from Heroku’s docs is what I used here, so I can’t trash them too badly!).
worker.py
First file you’re going to need here is a worker file, which will perform the function that it sees coming off a queue. For ease, I’ll name this worker.py file. This will connect to Redis, and just wait for a job to be put on the queue, and then run whatever it sees. First, we need rq the library that deals with Redis in the background (all of this is assuming you’re in a virtualenv
$ pip install rq
$ pip freeze > requirements.txt
This is the only external library you’re going to need for a functioning worker.py file, as specified by the nice Heroku doc. This imports the required objects from rq, connects to Redis using either an environment variable (that would be set in a production / Heroku environment), creates a worker, and then calls work. So in the end, running python worker.py will just sit there waiting to get jobs to run, in this case, scraping Reddit. We also have ‘high’ ‘default’ and ‘low’ job types, so the queue will know which ones to run first, but we aren’t going to need that here.
import os

import redis
from rq import Worker, Queue, Connection

listen = ['high', 'default', 'low']

redis_url = os.getenv('REDISTOGO_URL', 'redis://localhost:6379')

conn = redis.from_url(redis_url)

if __name__ == '__main__':
 with Connection(conn):
 worker = Worker(map(Queue, listen))
 worker.work()
clock.py
Now that we have the worker set up, here’s the clock.py file that I’m using to do the scraping. Here, it imports the conn variable from the worker.py file, uses that to make sure we’re connected to the same Redis queue. We also import the functions that use the scrapers from run.py, and in this file, create functions that will enqueue the respective functions. Then we use apscheduler to schedule when we want to call these functions, and then start the scheduler. If we run python clock.py, we scheduler will run in perpetuity (hopefully), and then will call the correct code on the intervals we defined.
For this, we’re going to need to pip install apscheduler, and then again, save in requirements for use on Heroku later, and frankly, for anywhere else you might want to use this code.
$ pip install apscheduler
$ pip freeze > requirements.txt
In the code below, I’m looking for threads with amazon.com links every 30 minutes (since this is searchable, and there aren’t more than a few per half hour anyway), and then looks for new comments using the /comments endpoint, and there are about 400-500 per minute. In terms of hits on Reddit, all these scrapers combined make something like 5 per minute, so it’s definitely not going to overload their servers, considering I probably make more requests than that per minute just browsing.
from apscheduler.schedulers.blocking import BlockingScheduler
from rq import Queue
from worker import conn
from run import run_gather_threads, run_gather_comments

import logging
import sys
logging.basicConfig(stream=sys.stdout, level=logging.DEBUG)

sched = BlockingScheduler()

q = Queue(connection=conn)

def gather_threads():
 q.enqueue(run_gather_threads)

def gather_comments():
 q.enqueue(run_gather_comments)

sched.add_job(gather_comments) #enqueue right away once
sched.add_job(gather_comments, 'interval', minutes=1)
sched.add_job(gather_threads) #enqueue right away once
sched.add_job(gather_threads, 'interval', minutes=30)
sched.start()
The actual code that does the work (the functions run_gather_comments and run_gather_threads) can live anywhere, even in the clock.py file. But since all these files have nice, short, one word names, I put that code in run.py file, which loads the scraper object from a different file, to keep all the logic separate. I’m won’t go over the scraping here since that’s a different topic.
Just so everything is complete, here’s this run.py file.
#run.py

from scrapers.reddit_scraper import RedditScraper

rs = RedditScraper()
def run_gather_threads():
  #code that goes to reddit and gets thread info
  rs.gather_threads()
  print "Gathering Threads"

def run_gather_comments():
  #code that goes to reddit and gets comment info
  print "Gathering Comments"
  rs.gather_comments()
Running Locally
Now with these files set up, open up three tabs in your terminal, all within the correct folder, and all making sure you have the correct pip libraries installed either globally, or within your virtual environment.
The first tab, run redis-server, which you can install with homebrew if you haven’t yet. In the second tab, run python worker.py which should output something like the following, and then hang, waiting for work:
(pm)MacBook-Pro:product_mentions_scraper jackschultz$ python worker.py
12:05:12 RQ worker u'rq:worker:MacBook-Pro.91002' started, version 0.7.0
12:05:12 Cleaning registries for queue: high
12:05:12 Cleaning registries for queue: default
12:05:12 Cleaning registries for queue: low
12:05:12
12:05:12 *** Listening on high, default, low...
And then in the last tab, run python clock.py which will look something like the following:
(pm)MacBook-Pro:product_mentions_scraper jackschultz$ python clock.py
INFO:apscheduler.scheduler:Adding job tentatively -- it will be properly scheduled when the scheduler starts
INFO:apscheduler.scheduler:Adding job tentatively -- it will be properly scheduled when the scheduler starts
INFO:apscheduler.scheduler:Adding job tentatively -- it will be properly scheduled when the scheduler starts
INFO:apscheduler.scheduler:Adding job tentatively -- it will be properly scheduled when the scheduler starts
INFO:apscheduler.scheduler:Added job "gather_comments" to job store "default"
INFO:apscheduler.scheduler:Added job "gather_comments" to job store "default"
INFO:apscheduler.scheduler:Added job "gather_threads" to job store "default"
INFO:apscheduler.scheduler:Added job "gather_threads" to job store "default"
INFO:apscheduler.scheduler:Scheduler started
DEBUG:apscheduler.scheduler:Looking for jobs to run
INFO:apscheduler.executors.default:Running job "gather_comments (trigger: date[2016-12-14 14:16:53 CST], next run at: 2016-12-14 14:16:53 CST)" (scheduled at 2016-12-14 14:16:53.540472-06:00)
INFO:apscheduler.scheduler:Removed job 21c09dc20e0446049a4893733a59f313
INFO:apscheduler.scheduler:Removed job 3ca03aa6b5394b84ab1c1bb33cfef029
DEBUG:apscheduler.scheduler:Next wakeup is due at 2016-12-14 14:17:53.542955-06:00 (in 59.998510 seconds)
INFO:apscheduler.executors.default:Running job "gather_threads (trigger: date[2016-12-14 14:16:53 CST], next run at: 2016-12-14 14:16:53 CST)" (scheduled at 2016-12-14 14:16:53.543268-06:00)
INFO:apscheduler.executors.default:Job "gather_comments (trigger: date[2016-12-14 14:16:53 CST], next run at: 2016-12-14 14:16:53 CST)" executed successfully
INFO:apscheduler.executors.default:Job "gather_threads (trigger: date[2016-12-14 14:16:53 CST], next run at: 2016-12-14 14:16:53 CST)" executed successfully
When that runs, you should see the worker tab print out “Gathering Threads” and then run that job. And every minute after, it will run the gather_comments function as well.
So you can see here that since each of those scripts just hangs and waits for their time to do work, either push jobs to the queue like clock.py does, or run jobs from the queue like worker.py does. If you restart clock.py, you’ll get the initial enqueue, and then it’ll enqueue every minute and 30 minutes after without regard to what was enqueued before. If you restart worker.py, it’ll just look for everything that’s in the queue and run that code. Hopefully this all makes sense after seeing it run locally, and watching the output. No good having code running that you don’t understand.
Running on Heroku
Getting this running on Heroku is pretty much just as simple, in this case, just create a file named Procfile that looks like this:
web: python app.py
clock: python clock.py
worker: python worker.py
This defines the different dynos that Heroku will run. A web, that runs app.py (for the Flask interface that I have to show the scraping logs), then a clock dyno that will run the clock script, and a worker dyno that runs the worker script.
Before pushing these changes to Heroku, you’ll need to add the Redis To Go add-on, which runs when you click the button in your app dashboard that defines the add ons. Then git push heroku master the new files and watch the workers go! You can see how they’re doing with heroku logs which you can see and output printed by the workers.
Where To Go From Here
Heroku is super easy, like, really easy in terms of getting up and going with background jobs, but there are some issues that I’ll outline here. First off, making external requests like I’m doing here takes a really long time. For me, requesting 4 pages from Reddit locally takes me ~12 seconds, while running that on Heroku takes ~40. Take a look at the logs below.
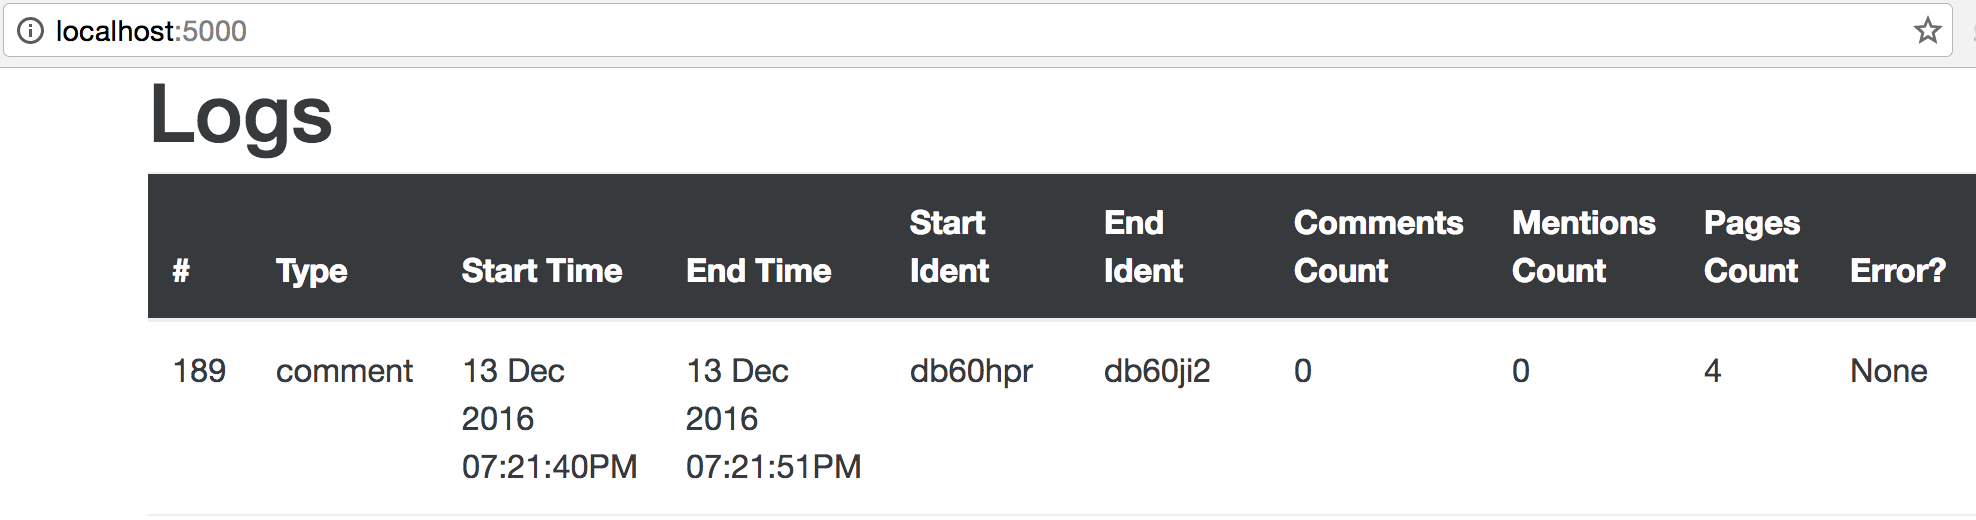
Local

Heroku
Scaling up the number of workers, even if I split out the requesting so each worker process would only make one request isn’t going to change the fact that requests are slow in general. And this time difference isn’t going to cut it long term, especially if I plan to try to get more data than just comments that are streaming through. And the way I have it set up now,
To be clear though, just because something isn’t going to work long term doesn’t mean it isn’t useful to have in the meantime. This took about 10 minutes to get up and going by looking at the Heroku docs on the subject. And with some seriously great copy paste action there, I got a prototype up and going easily, where I could focus on getting code that does what I want.
In general, I’m a big fan of doing quick, easy way that works, and then dealing with scaling after. Having a prototype like I have at productmentions.com right now is what I want, and then I can deal with scaling and improving performance after, which in this case means refactoring these scrapers to better adhere to the worker process mentality, and getting them off Heroku, probably using Docker to encapsulate what I want. So stay tuned for that!
As always, follow on Twitter if you feel like it, and also, get in contact if you ever have data needs, personal, or business-wise.

Pingback: A Practical Use For Python Decorators | Big-Ish Data