Apache Airflow Part 2 — Connections, Hooks, reading and writing to Postgres, and XComs

In part 1, we went through have have basic DAGs that read, logged, and write to custom files, and got an overall sense of file location and places in Airflow. A lot of the work was getting Airflow running locally, and then at the end of the post, a quick start in having it do work.

In part 2 here, we’re going to look through and start some read and writes to a database, and show how tasks can run together in a directed, acyclical manner. Even though they’ll both be with a single database, you can think of stretching them out in other situations.

Again, this post will assume you’re going through and writing this code on your own with some copy paste. If you’re on the path of using what I have written, checkout the github repo here.

Creating database

This post is going to go through and write to postgres. We already created a database for Airflow itself to use, but we want to leave that alone.

So before we get to any of the python code, go and create the new database, add a new user with password, and then create the dts (short name for datetimes, since that’s all we’re doing here) table.

bigishdata=> create table dts (id serial primary key, run_time timestamp, execution_time timestamp);
CREATE TABLE
bigishdata=> \dt
            List of relations
 Schema | Name  | Type  |     Owner
--------+-------+-------+----------------
 public | dts   | table | bigishdatauser
(1 rows)

bigishdata=# \d dts
                                          Table "public.dts"
     Column     |            Type             | Collation | Nullable |             Default
----------------+-----------------------------+-----------+----------+---------------------------------
 id             | integer                     |           | not null | nextval('dts_id_seq'::regclass)
 run_time       | timestamp without time zone |           |          |
 execution_time | timestamp without time zone |           |          |
Indexes:
    "dts_pkey" PRIMARY KEY, btree (id)

Adding the Connection

Connections is well named term you’ll see all over in Airflow speak. They’re defined as “[t]he connection information to external systems” which could mean usernames, passwords, ports, etc. for when you want to connect to things like databases, AWS, Google Cloud, various data lakes or warehouses. Anything that requires information to connect to, you’ll be able to put that information in a Connection.

With airflow webserver running, go to the UI, find the Admin dropdown on the top navbar, and click Connections. Like example DAGs, you’ll see many default Connections, which are really great to see what information is needed for those connections, and also to see what connections are available and what platforms you can move data to and from.

Take the values for the database we’re using here — the (local)host, schema (meaning database name), login (username), password, port — and put that into the form shown below. At the top, you’ll see Conn Id, and in that input create a name for the connection. This name is clearly important, and you’ll see that we use that in order to say which Connection we want.

Screen Shot 2020-03-29 at 4.40.22 PM.png

When you save this, you can go to the Airflow database, find the connection table, and you can see the see the values you inputted in that form. You’ll also probably see that your password is there in plain text. For this post, I’m not going to talk about encrypting it, but you’re able to do that, and should, of course.

One more thing to look at is in the source code, the Connection model, form, and view. It’s a flask app! And great to see the source code to get a much better understanding for something like adding information for a connection.

Hooks

In order to use the information in a Connection, we use what is called a Hook. A Hook takes the information in the Connection, and hooks you up with the service that you created the Connection with. Another nicely named term.

Continue reading

Optimizing a Daily Fantasy Sports NBA lineup — Knapsack, NumPy, and Giannis

Pic when I was sitting courtside on Oct 24th, 2018. If you zoom in a little, you can see Giannis about to make a screen, while Embiid watches from the other side of the court to help out if the screen is successful. Both players were in the optimal lineup that night.

Opener

In the data world, when looking for projects or an interesting problem, sports almost always gives you the opportunity. For a lot of what I write, I talk about getting the data because the sports leagues rarely if ever give the data away. That gets a little repetitive, so I wanted to change it up to something interesting that’s done after you get the data, like how to optimize a lineup for NBA Daily Fantasy Sports (DFS).

Before continuing, I’ll say that this isn’t about me making money from betting. In the past season I made lineups for some of the nights, but realized quickly that in order to win, you really need to know a ton about the sport. I love watching the NBA in the winter, love watching the Bucks, but don’t follow all other teams close to enough compared to others. Still, I found it worth it to keep getting the data during the regular season and found it most interesting to find out who would have been in the best lineup that night, and then look back at the highlights to see why a certain player did well.

Because of that, I took the code I used, refactored it some, and wrote this up to show what I did to get to the point where I can calculate the best lineup.

Knapsacking

This optimization is generally categorized as a Knapsack problem. The wiki page for the Knapsack Problem defines it as follows:

“””Given a set of items, each with a weight and a value, determine the number of each item to include in a collection so that the total weight is less than or equal to a given limit and the total value is as large as possible.”””

Or, self described – If you’re stealing items of known value, but only are able to carry a certain amount of weight, how do you figure out which items to take?

This DFS problem though is slightly different than the standard Knapsack problem, and makes it much more interesting.

FanDuel Rules

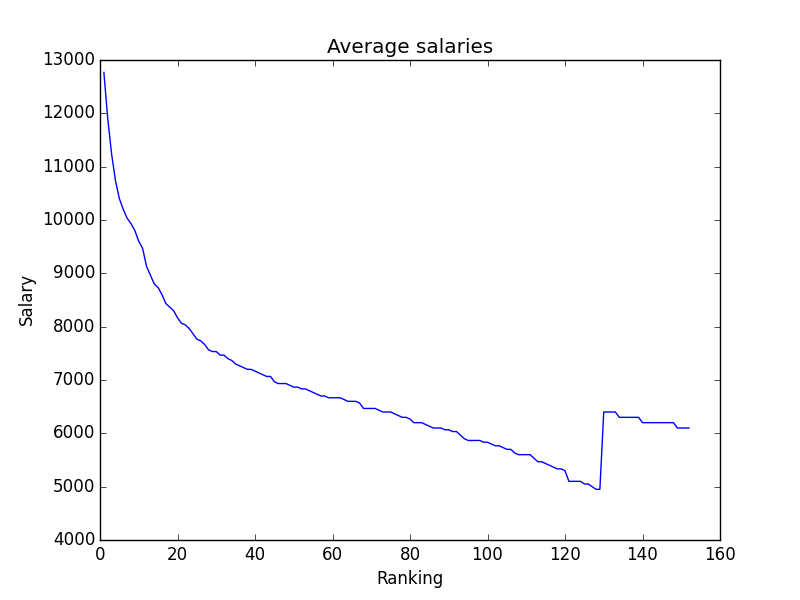
The DFS site I’m using for this is FanDuel, one of the two main Daily Fantasy Sports sites. Their rules for the NBA are that all players are assigned a position, Point Guard (PG), Shooting Guard (SG), Small Forward (SF), Power Forward (PF), and Center (C). A line up will have 2 PGs, 2 SGs, 2 SFs, 2 PFs, and 1 C. Each player is given a salary, and the combined salary of the players in your lineup must not be above $60,000. For reference, to give a sense of salary distribution, and what you’ll see in the final solution for best lineup of October 24th, 2018, MVP Giannis Antetokounmpo had a salary of $11,700, and ear blower and member of the Lakers Meme-Team, Lance Stephenson has a salary of $3,900. This data was given in csv files from FanDuel that we can download.

The amount of points a player gets depends on a bunch of stats for the night, positive points for things like actual points, rebounds, 3 point attempts made, assists, steals, and negative points for things like turnovers. This data comes from nba.com which I scraped and loaded into postgres.

Data

Below is a screenshot of what an example salary csv file that we can download looks like. Note that this is for a different date than the example day I’m using. I didn’t get the csv from FanDuel on that date, I had to scrape it from somewhere else, but it’s still important to give a look of what the csv file looks like. For our simple optimization, we only need the name, the position, and the salary of all the players.

Secondly, we need the stat lines which I then use to calculate the number of points a player got in a night. Below is a screenshot from stats.nba.com where it show’s how a player did that night. I have a script that scrapes that data the next day and puts that into the db.

If you look at the data csv files in the repo, all I have here is the name, position, salary, and points earned. This is a post about optimization, not about data gathering. If you’re wondering a little, here’s the query I used to get the data. I have players, positions, stat_lines, games, and some other tables. A lot of work goes into getting all this data synced up.

select p.id as pid, p.fd_name as name, sl.fd_positions as pos, sl.fd_salary as sal, sl.fd_points as pts from stat_lines sl join games g on sl.game_id=g.id join players p on p.id=sl.player_id where g.date='2018-10-24' and sl.fd_salary is not null order by sal desc

Code

Here’s the link to all the code on github. In it, you’ll find the csv files of data, three separate scripts to run the three different optimization methods, and three files for the Jupyter notebooks to look at a simplified example of the code.

Continuing

In the rest of the post, I’ll go through the three slightly different solutions for the problem. The first uses basic python elements and is pretty slow. The second brisk solution uses libraries like Pandas and NumPy to speed up the calculation quite a bit. The final fast solution goes beyond the second, ignoring most python structures, and uses matrices to improve the quickness an impressive amount.

In all cases, I made simple Jupyter files that go through how they each combine positions which hopefully give a little interactive example of the differences to try to show it more than words can do. In each case, when you go through them, you’ll see at the bottom they all return the same answer of what are the best players, what their combined salary is, and what their point totals are.

I talk about salaries, points, and indexes a lot. Salaries are the combined salaries of the players in a group, points are the combined points of the players in a group, and indexes are the the indexes from the csv file or the pandas dataframe which represent which players are in a group. Instead of indexes, we could use their names instead. Don’t get this confused when I talk about the indexes in the numpy arrays / matrixes that are needed to find which groupings are the best. To keep the index talk apart, I’ll refer to the indexes of the players as the player indexes. Also, I sometimes mix salary and cost, so if you see either of those words, they refer to the same thing.

If you have any questions, want clarification, or find mistakes, get in contact. Also I have twitter if you feel like looking at how little I tweet.

Basic solution

Time to talk about the solutions. There are effectively two parts to the problem at the start of basic. The first is combining the positions themselves together. From the FD rules, we need two PGs together. The goal of this is to return, for each salary as an input, the combination of players of the same position who have a combined salary less than the inputted salary with the most combined points.

Said a different way, for each salary of the test, we want to double loop through the same initial position array, and find the most successful combination where the combined salary is less than the salary we’re testing against.

The second part deals with combining each of those returned values together. Say we have the information about the best two PGs and the best two SGs. Again, for each salary as input, it returns the best combination of players below that salary. This is pretty much identical to what I said about the first part, with the only difference being that we didn’t start with two groups of the same players. Loop through the possible values of the salary possibilities, double loop through the arrays of positions, find the players who have the max points where the sum of their salaries is less than the salary value we’re testing.

There’s a lot of code in the solution, so I’ll post only a little, which was taken from the Jupyter file I created to further demonstrate. Click that, go through the lines of example code, and look at the double loops and see how the combinations are created. If you’re reading this, it’s worth it. To get a full look look here’s the link directly to the file on github.

#pgs, and sgs have the format of [(salary, points, [inds...])...]
#where salary is the combined cost of the players with inds in inds, points is the sum of points.

test_salary = 45000 #example test salary.
max_found_points = 0
for g1 in pgs:
    for g2 in sgs:
        if g1[0] + g2[0] > test_salary:
            break #assuming in sorted salary order, which they are
        points = g1[1] + g2[1]
        if points > max_found_points:
            max_found_points = points
            top_players = g1[2] + g2[2] #combining two lists
            top_points = points
            top_sal = g1[0] + g2[0]
return (top_sal, top_points, top_players)
#after the loop we have a new tuple of the same format (salary, points, [inds])
#where this is the best combo of players in pgs and sgs who don't have a total salary
#sum greater than the test salary

Here’s a slow gif of it running where you can see the time it takes to do the combinations. In the end, it prints out the names and info for the winners in the lineup. I also use cProfile and pstats to time the script, and also show where it’s being slow. This run took a tiny bit under 50 seconds to run (as you’ll see from the timing logs) so don’t think you’ll have to sit there and wait for minutes.

Brisk solution

After completing the first, most basic solution, it was time to move forward and write the solution which removes some of those loops by using numpy arrays.

Continue reading

Using Clustering Algorithms to Analyze Golf Shots from the U.S. Open

Cluster analysis can be considered one of the pillars of machine learning, and yet it’s one that’s difficult to talk about.

First off, it’s difficult to find specific use cases for clustering, other than pretty pictures. When looking through the wiki page on clustering, we’re told one of the uses is market research, where analysts use surveys to group together customers for market segmentation. That sounds great in theory, but the results don’t end with specific numbers telling the researchers what to do. Second, in so many cases, the hardest part of data science projects, or tutorials, is finding real world data that have the different results you want to show. In this case, I’m incredibly lucky.

I have a golf background, and on U.S. Open’s website, they have these interactive graphs that show where each ball was located after each stroke for every player. If you click around, you can see who hit what shot, how far the shot went and how far remains between the ball and the hole. For cluster analysis, we’re going to use the location. For you to check out how I got the data, look and read here.

Shinnecock Hills, the host of the 2018 U.S. Open last week, has a few parts of the course where balls roll to collection areas into groups, or, ya know, clusters. Here are the specific shots our clustered data is coming from.

Hole 10, Round 1, Off the Tee

The description that the USGA gives hole number 10 is

The player faces a decision from the tee: hit a shot of about 220 yards to a plateau, leaving a relatively level lie, or drive it over the hill. Distance control is critical on the approach shot, whether from 180 yards or so to a green on a similar plateau, or with a shorter club at the bottom of the hill or, more dauntingly, part of the way down the hill. The approach is typically downwind, to a green with a closely mown area behind it.

First I’ll say, always hit driver off the tee. Look at the cluster! If you get it down the hill you’ll be in the fairway! In the vast, vast majority of the time, it’s better to be closer to the hole. Golf tips aside, when I first saw this graph, it popped out as a great example to use as a clustering example.

Shift command 4 if you want selective screenshots

When looking at this picture, the dots represent where the players hit their tee shots on hole 10 in the first round, and the colors show how many strokes it took them to finish the hole in relation to par. For this, we’re ignoring the final score and only looking at the shots themselves.

Hole 10, Round 1, Approaching the green

One data set isn’t good enough to demonstrate the differences of the algorithms, and I wanted to find an example of a green with collection areas that would make approach shots group together. Little did I know, the 10th green, the same hole as the one above showing the drives, is the best example out there. If you’re short, it rolls back to you. If you’re long, it rolls away. You gotta be sure to hit the green. You can see that here.

So this will be a second example of data for all the algorithms.

Algorithms themselves

This time, in this blog post, I’m only looking for results, not going through the algorithms themselves. There are other tutorials online talking about them, but for now at least, we’re only getting little introductions to the algorithms and thoughts.

Instead, I use the Scikit-Learn implementations of the algorithms. Scikit-Learn offers plenty of clustering algorithms, which I could spend hours using and writing about, but for this post, the ones I chose are K Means, DBSCAN, Mean Shift, Agglomerative Clustering.

Other Notes

Before going in to the algorithms, here are a few notes on what to expect.

  • Elevation is key as to why there are clusters. If you look around the other holes, you won’t see close to as much distribution and clusters of shot results. Now, if we had elevation as a data point as well, then we could really do some great cluster analyses.
  • The X and Y values on the sides of the graphs represent yards from the hole, which is located at the (0,0) location. If you look at the first post, I show that if you measure the hypotenuse using those X and Y numbers, you’ll have the yardage to the pin.
  • This isn’t a vast data set. We have 156 points in the two data sets because that’s how many players there were in the tournament.
  • If you’re wondering which part took the longest, it was writing the matplotlib code to automatically create figures with multiple plots for different input variables, and have them all show up at once. Presentation is key, and that took tons of time.

Code

I put all the code and data on Github here, so if you want to see what’s going on behind the scenes and what it took to do the analysis, look there.

Questions, comments, concerns, notes, thoughts, etc: contact, twitter, and golf twitter if you’re interested in that too. Ok, algorithm time.

K Means

I’m starting with K Means because this was the clustering algorithm I was first introduced to, and one that I had to write myself during a machine learning class in college.

Continue reading

U.S. Open Data — Gathering and Understanding the Data from 2018 Shinnecock

After losing in a playoff to make it out of the local qualifying for the 2018 US Open at Shinnecock, I’m stuck at my apartment watching everyone struggle, wondering how much I’d be struggling if I was there myself.

Besides on TV, the US Open website offers some other way to follow what players are doing. As shown here, they very generously give us information on everyone’s shots on different holes. We’re able to see where people hit the ball, on which shot, and what their resulting score was on the hole. For example, why in the world did Tony Finau, the currently second ranked longest hitter on tour, hit it short off the first tee, leave himself 230 yards to the hole where he makes bogey?

Why didn’t Tony rip D?

One of the cool things these images show is the groupings of all the shots on a hole, like the tee shots here. And when I see very specific and interactive data like we have here, I know it comes from somewhere that I’m able to see myself. So I figured I should grab that data and do some cluster analysis on different holes to see if there are certain spots that players like to hit it.

Here, I’ll go through the data we have, what the values and the numbers mean, and also the code I wrote to eat up the data and display the graphs. Once I have this part going, I’ll be able to perform further analysis to most things that come to mind.

Any questions, comments, concerns, trash talking, get in touch: twitter, contact.

Current Posts

Using Clustering Algorithms to Analyze Golf Shots

Finding the data

First step was to search for where the data for the hole insights page was coming from. As always, open the dev tools, click on the network tab, and find what’s getting called with a pretty name.

Alert!

The file itself is quite dense and has all the information, which is really cool! It has IDs for all the players, all the shots they have on the hole, which include the starting distance from the flag and the ending distance to the flag.

First off, we’re given a list of Ps, meaning an array of player information, like this:

...
{u'FN': u'Justin', u'ID': u'33448', u'IsA': False, u'LN': u'Thomas', u'Nat': u'USA', u'SN': u'THOMAS'},
{u'FN': u'Dustin', u'ID': u'30925', u'IsA': False, u'LN': u'Johnson', u'Nat': u'USA',u'SN': u'JOHNSON D'}
{u'FN': u'Tiger', u'ID': u'08793', u'IsA': False, u'LN': u'Woods', u'Nat': u'USA', u'SN': u'WOODS'}
...

It looks like we have first name, player’s ID, whether or not they’re an amateur, last name, nationality, scoreboard name. The important part of this information is the ID, where we’ll be able to match players to shots.

Next, we’re given a few stats on the hole for the day:

Continue reading

How to Build Your Own Blockchain Part 4.2 — Ethereum Proof of Work Difficulty Explained

We’re back at it in the Proof of Work difficulty spectrum, this time going through how Ethereum’s difficulty changes over time. This is part 4.2 of the part 4 series, where part 4.1 was about Bitcoin’s PoW difficulty, and the following 4.3 will be about jbc’s PoW difficulty.

TL;DR

To calculate the difficulty for the next Ethereum block, you calculate the time it took to mine the previous block, and if that time difference was greater than the goal time, then the difficulty goes down to make mining the next block quicker. If it was less than the time goal, then difficulty goes up to attempt to mine the next block quicker.

There are three parts to determining the new difficulty: offset, which determines the standard amount of change from one difficulty to the next; sign, which determines if the difficulty should go up or down; and bomb, which adds on extra difficulty depending on the block’s number.

These numbers are calculated slightly differently for the different forks, Frontier, Homestead, and Metropolis, but the overall formula for calculating the next difficulty is

target = parent.difficulty + (offset * sign) + bomb

Other Posts in This Series

Pre notes

For the following code examples, this will be the class of the block.

class Block():
  def __init__(self, number, timestamp, difficulty, uncles=None):
    self.number = number
    self.timestamp = timestamp
    self.difficulty = difficulty
    self.uncles = uncles

The data I use to show the code is correct was grabbed from Etherscan.

Continue reading

How to Build Your Own Blockchain Part 3 — Writing Nodes that Mine and Talk

Hello all and welcome to Part 3 of building the JackBlockChain — JBC. Quick past intro, in Part 1 I coded and went over the top level math and requirements for a single node to mine its own blockchain; I create new blocks that have the valid information, save them to a folder, and then start mining a new block. Part 2 covered having multiple nodes and them having the ability to sync. If node 1 was doing the mining on its own and node 2 wanted to grab node 1’s blockchain, it can now do so.

For Part 3, read the TL;DR right below to see what we got going for us. And then read the rest of the post to get a (hopefully) great sense of how this happened.

Other Posts in This Series

TL;DR

Nodes will compete to see who gets credit for mining a block. It’s a race! To do this, we’re adjusting mine.py to check if we have a valid block by only checking a section of nonce values rather than all the nonces until a match. Then APScheduler will handle running the mining jobs with the different nonce ranges. We shift the mining to the background if we want node.py to mine as well as being a Flask web service. By the end, we can have different nodes that are competing for first mining and broadcasting their mined blocks!

Before we start, here’s the code on Github if you want to checkout the whole thing. There are code segments on here to illustrate about what I did, but if you want to see the entire code, look there. The code works for me, but I’m also working on cleaning everything up, and writing a usable README so people can clone and run it themselves. Twitter, and contact if you want to get in contact.

Mining with APScheduler and Mining Again

The first step here is to adjust mining to have the ability to stop if a different node has found the block with the index that it’s working on. From Part 1, the mining is a while loop which will only break whenz it finds a valid nonce. We need the ability to stop the mining if we’re notified of a different node’s success.

Continue reading

How to Build Your Own Blockchain Part 2 — Syncing Chains From Different Nodes

Welcome to part 2 of the JackBlockChain, where I write some code to introduce the ability for different nodes to communicate.

Initially my goal was to write about nodes syncing up and talking with each other, along with mining and broadcasting their winning blocks to other nodes.   In the end, I realized that the amount of code and explanation to accomplish all of that was way too big for one post. Because of this, I decided to make part 2 only about nodes beginning the process of talking for the future.

By reading this you’ll get a sense of what I did and how I did it. But you won’t be seeing all the code. There’s so much code involved that if you’re looking for my total implementation you should look at the entire code on the part-2 branch on Github.

Like all programming, I didn’t write the following code in order. I had different ideas, tried different tactics, deleted some code, wrote some more, deleted that code, and then ended up with the following.

This is totally fine! I wanted to mention my process so people reading this don’t always think that someone who writes about programming does it in the sequence they write about it. If it were easy to do, I’d really like to write about different things I tried, bugs I had that weren’t simple to fix, parts where I was stuck and didn’t easily know how to move forward.

It’s difficult to explain the full process and I assume most people reading this aren’t looking to know how people program, they want to see the code and implementation. Just keep in mind that programming is very rarely in a sequence.

Twitter, contact, and feel free to use comments below to yell at me, tell me what I did wrong, or tell me how helpful this was. Big fan of feedback.

Other Posts in This Series

TL;DR

If you’re looking to learn about how blockchain mining works, you’re not going to learn it here. For now, read part 1 where I talk about it initially, and wait for more parts of this project where I go into more advanced mining.

At the end, I’ll show the way to create nodes which, when running, will ask other nodes what blockchain they’re using, and be able to store it locally to be used when they start mining. That’s it. Why is this post so long? Because there is so much involved in building up the code to make it easier to work with for this application and for the future.

That being said, the syncing here isn’t super advanced. I go over improving the classes involved in the chain, testing the new features, creating other nodes simply, and finally a way for nodes to sync when they start running.

For these sections, I talk about the code and then paste the code, so get ready.

Expanding Block and adding Chain class

This project is a great example of the benefits of Object Oriented Programming. In this section, I’m going to start talking about the changes to the Block class, and then go in to the creation of the Chain class.

The big keys for Blocks are:

Continue reading

How to Build Your Own Blockchain Part 1 — Creating, Storing, Syncing, Displaying, Mining, and Proving Work

I can actually look up how long I have by logging into my Coinbase account, looking at the history of the Bitcoin wallet, and seeing this transaction I got back in 2012 after signing up for Coinbase. Bitcoin was trading at about $6.50 per. If I still had that 0.1 BTC, that’d be worth over $500 at the time of this writing. In case people are wondering, I ended up selling that when a Bitcoin was worth $2000. So I only made $200 out of it rather than the $550 now. Should have held on.

Thank you Brian.

Despite knowing about Bitcoin’s existence, I never got much involved. I saw the rises and falls of the $/BTC ratio. I’ve seen people talk about how much of the future it is, and seen a few articles about how pointless BTC is. I never had an opinion on that, only somewhat followed along.

Similarly, I have barely followed blockchains themselves. Recently, my dad has brought up multiple times how the CNBC and Bloomberg stations he watches in the mornings bring up blockchains often, and he doesn’t know what it means at all.

And then suddenly, I figured I should try to learn about the blockchain more than the top level information I had. I started by doing a lot of “research”, which means I would search all around the internet trying to find other articles explaining the blockchain. Some were good, some were bad, some were dense, some were super upper level.

Reading only goes so far, and if there’s one thing I know, it’s that reading to learn doesn’t get you even close to the knowledge you get from programming to learn. So I figured I should go through and try to write my own basic local blockchain.

A big thing to mention here is that there are differences in a basic blockchain like I’m describing here and a ‘professional’ blockchain. This chain will not create a crypto currency. Blockchains do not require producing coins that can be traded and exchanged for physical money. Blockchains are used to store and verify information. Coins help incentive nodes to participate in validation but don’t need to exist.

The reason I’m writing this post is 1) so people reading this can learn more about blockchains themselves, and 2) so I can try to learn more by explaining the code and not just writing it.

In this post, I’ll show the way I want to store the blockchain data and generate an initial block, how a node can sync up with the local blockchain data, how to display the blockchain (which will be used in the future to sync with other nodes), and then how to go through and mine and create valid new blocks. For this first post, there are no other nodes. There are no wallets, no peers, no important data. Information on those will come later.

Other Posts in This Series

TL;DR

If you don’t want to get into specifics and read the code, or if you came across this post while searching for an article that describes blockchains understandably, I’ll attempt to write a summary about how a blockchains work.

At a super high level, a blockchain is a database where everyone participating in the blockchain is able to store, view, confirm, and never delete the data.

On a somewhat lower level, the data in these blocks can be anything as long as that specific blockchain allows it. For example, the data in the Bitcoin blockchain is only transactions of Bitcoins between accounts. The Ethereum blockchain allows similar transactions of Ether’s, but also transactions that are used to run code.

Slightly more downward, before a block is created and linked into the blockchain, it is validated by a majority of people working on the blockchain, referred to as nodes. The true blockchain is the chain containing the greatest number of blocks that is correctly verified by the majority of the nodes. That means if a node attempts to change the data in a previous block, the newer blocks will not be valid and nodes will not trust the data from the incorrect block.

Don’t worry if this is all confusing. It took me a while to figure that out myself and a much longer time to be able to write this in a way that my sister (who has no background in anything blockchain) understands.

If you want to look at the code, check out the part 1 branch on Github. Anyone with questions, comments, corrections, or praise (if you feel like being super nice!), get in contact, or let me know on twitter.

Step 1 — Classes and Files

Step 1 for me is to write a class that handles the blocks when a node is running. I’ll call this class Block. Frankly, there isn’t much to do with this class. In the __init__ function, we’re going to trust that all the required information is provided in a dictionary. If I were writing a production blockchain, this wouldn’t be smart, but it’s fine for the example where I’m the only one writing all the code. I also want to write a method that spits out the important block information into a dict, and then have a nicer way to show block information if I print a block to the terminal.

class Block(object):
  def __init__(self, dictionary):
  '''
    We're looking for index, timestamp, data, prev_hash, nonce
  '''
  for k, v in dictionary.items():
    setattr(self, k, v)
  if not hasattr(self, 'hash'): #in creating the first block, needs to be removed in future
    self.hash = self.create_self_hash()

  def __dict__(self):
    info = {}
    info['index'] = str(self.index)
    info['timestamp'] = str(self.timestamp)
    info['prev_hash'] = str(self.prev_hash)
    info['hash'] = str(self.hash)
    info['data'] = str(self.data)
    return info

  def __str__(self):
    return "Block<prev_hash: %s,hash: %s>" % (self.prev_hash, self.hash)

When we’re looking to create a first block, we can run the simple code.

Continue reading

Defense Matters in the NBA, Apparently

Interesting article here from Arxiv titled Finding Common Characteristics Among NBA Playoff Teams: A Machine Learning Approach.

Everyone should skim the paper because it’ll show you that these academic papers aren’t overwhelming, and a lot of times, they’re good at showing steps that go into tackling a machine learning problem. This paper, for example, goes over the basics of decision trees, pruning decision trees, as well as more high powered decision trees. Great progression.

As for what they found, apparently opponent’s stats are the most important determinants in whether a team makes the playoffs, with opponent field goal percentage and opponent points per game leading the way. Play good defense, and doesn’t matter how many points you score yourselves.

Only comment is that if you’re sitting out there thinking “well NBA teams don’t play defense anyway blah blah blah” you’re wrong. Defense is probably the most impressive aspect of a game to watch, especially in the playoffs currently going on.

Importance of variables is a really interesting topic in machine learning, sports especially. Knowing which variables matter can help someone in charge figure out who to draft (Moneyball style) or possibly what aspects to focus on during games or practice. Considering I have a bunch of PGA Tour data, maybe figuring out which stats are important for golfers should be something to focus on here…

Funny, they say that their “dataset was quite large”, so they only provided a sample of the data. 30 teams * 15 years * 44 variables = 19,800 data points. Too big to fit on a table in a paper sure, but don’t think I agree it’s quite large. More like big-ish. Fits in perfectly here.

When Curve Fitting Isn’t Ideal

This is the second sub problem that I’ve encountered in my DFS golf optimization / forecasting endeavor. The full post on what I’m working on is coming, and I’ll post the link to that here after I finished writing it. This sub problem here deals with finding a value function for how much a golfer is worth depending on where they’re projected to finish in the tournament.

In DFS, each golfer (or player for other sports) is given a salary that shows how much they’re worth. Your job is to come up with a combination of players that give the highest point total so that the sum of their salaries isn’t more than the salary cap. In general, golfers that are expected to do better than others are given a higher salary.

As a part of my analysis, I need to figure out about how much a golfer is worth if they are projected to finish X best out of all the golfers. In other words: If a player is projected to finish 10th in the tournament, what should their salary be?

There are a few ways of thinking about this which I’ll explain below.

1) Use the actual salaries 

I’m running this optimization and re-ranking of players on a week to week basis. So after I re-rank, I could just value the player in 10th place the 10th highest salary of the week. This is what I tried initially, but it gave some funky results. This week is the Memorial, and the 10th player (Tiger) has a salary of 10k, while the 11th players (Bill Haas) has a salary of 9.2k. That drop of 800 is huge when most of the mispricings are in the 400 range. In fact, by using this way of valuing players, Tiger was the worst priced player, and Haas was 2nd best priced player, all because of this gap. Clearly I’ll need a different method.

2) Since we’re actually trying to project how many points these players will score, use the average of points for players who finished in a certain position.

Quickest way to check on this is to graph the values and see what they look like. Sorry, Matplotlib isn’t exactly the prettiest to look at.

combined_pts

The graph above has that little hitch because I’m only using results from the Colonial and the Byron Nelson. With more results, we can hope to see something a little more standard. Also, I needed to do a little math on the results file that Draftkings gives after a contest is over. Take al look at that writeup here.

Another thing to note about the graph above is that noticeable dropoff around 70-75th place. Only 70 and ties make the cut for a PGA Tour event, and that drop indicates how important it is for players in your lineup to make the cut. If we can see the drop on this graph, you can tell how important it is for real.

3) Fit an exponential decay function to the average points scored to smooth out the plot

Theoretically, we should be seeing a very nice exponential decay for the point scored. The fit looks like the following.

combined_pts_with_fit

The fit looks pretty decent, but when running it against the past two week’s data, it seems like there isn’t enough variation from one spot to the next. This means that we aren’t able to differentiate as much as I’d like between the great plays and the ok plays.

4) Back to the salaries. They tend to drop off in decaying exponential fashion, so fit a function to the salaries, and use that.

The first step for this method was finding the average salary for each ranking from the salary files I have. Here’s a graph of what that looked like.

average_salaries

The hitch in the graph was from events that have a non standard field size, in this case, the Heritage and Colonial. To get rid of that hitch, I figured I’d only take into account the top 125 salaries.

I had two options for the fit, whether or not I would include a y0, or a bottom for the decay function. After graphing the two best fits, the answer to include a floor for the salaries was pretty clear.

You can barely see the curve of the fit

You can barely see the curve of the fit

Much closer

Much closer to the curve

But when I looked at this fit, I wasn’t really pleased with it. That addition ended up being about 6k (5792.21 rounded to two decimals), which meant that no player would ever have a salary lower than that. Since that isn’t the case at all, and sometimes playing golfers under that price point is a good idea, I needed to use the third and final way to figure out values.

5) Just use the averages of the salaries for all the rankings

In the end, all that work fitting a function was for nothing! This main advantage of just using the averages is that it uses actual salaries as a proxy so there’s no fitting. As we can see, the fit we used above didn’t really work too well because it doesn’t take into account the tailing off of the salaries. And when many of the value plays are around that salary level, we need to be as accurate as possible. And in the coming weeks when I have even better averages, these numbers should be better and better.

And by using this method, the initial results look good. In reality though, I need to build a testing method. One that picks a value function, optimizes lineups, and check to see which one actually gets the best results. I can do the eye test for now, but I’ll need hard numbers for real when I have a few more weeks of data. More to come.

Follow on twitter: @jack_schultz